This
help file describes how to operate your e-commerce web-catalog using the Control Panel.
There are 5 main modules:
- General Settings
- Category Manager
- Product Manager
- Order Manager
- Payment Manager
Overview of Functions
1. General Settings
- Change administrator's password
- Set number of products displayed per page in your Catalog and on Control
Panel
- Set number of pages shown on the navigation bar
- Set parameters of pop-up windows for View Details and Shopping Cart pages
- Set time to keep unpaid orders
- Edit administrator's e-mail address for confirmation letters
- Edit confirmation e-mail text
2. Category Manager
This module
consists of 2 parts:
A) Manage Catalog Categories:
- “New Category”
button - Add categories
- “New Subcategory” button - Add subcategories
- "Delete" button - Delete current category
- “Category”
link - Update current category
- “Subcategory”
link - Update or delete subcategory
- “Product List” link – Display
product list in current category/subcategory
B) Update Or Delete A Product Or Move A
Product To Another Category
- Click on any product, displayed
as a result of clicking on the “Product List” link to see the product update/delete/move
dialogue
3. Product Manager
This module consists of 3 parts:
A) Search For Product:
- View a list of products
from a particular category and subcategory or keyword search
- Update, delete or change
category and/or subcategory of a product through the “Product List” button
B) Update, Delete,
Or Move A Product To Another Category
- Click on any product, displayed
as a result of clicking on the “Product List” button to see the product
update/change/move dialogue
C) New Product
Form:
- Add a new product to the catalog
4. Order Manager
This module allows you to control and manage sales and trace errors.
5. Payment Manager
This module allows you to set payment gateway settings to accept online payments.
1. General Settings This module allows you to set
major parameters of your online catalog.

General Settings:
- "Admin's Password" - Change the default password ASAP and memorize it.
- "Products per Page" (Catalog) - Put a number of products that should be
shown on one page of your Catalog.
- "Products per Page" (Control Panel) - Put a number of products that
should be shown on one page of the Control Panel.
- "Number of Shown Pages" (Catalog's navigation bar) - Put a number of maximum of shown pages on the navigation bar of your catalog:

- "Number of Shown Pages" (Control Panel's navigation bar) - The same as
above, but applicable to the Control Panel.
View Details and Pop-up Window Settings:
- If you would like to display details and a bigger image of your products in a pop-up window - put checkmark in "Use" Pop-up window" field.
- "Resizable" - Put checkmark if you would like to use a resizable window.
- "Scrollable" - Put checkmark if you would like to use scrolling in
a pop-up window.
- "Pop-up Window Width" and "Pop-up Window Height" - Set the size of pop-up window in pixels.
Shopping Cart Settings:
- "Cart Window Width" and "Cart Window Height" - Set the size of Shopping Cart window in pixels.
Payment Settings:
- "Administrator's e-mail" - e-mail address for confirmation letters
- "Keep unpaid orders for" - Choose period (days) to store unpaid orders in database.
- "Confirmation e-mail" - Text that will be automatically emailed to your
customers when they complete their payment. This text contains the following meta-variables:
###1name### - customer's first name
###2name### - customer's surname
###URL### - URL that your customers can use to download their products if instant
download failed by any reason (customer accidentally closed his browser, technical problem etc.)
###myID### - signature (Administrator's e-mail)

2. Category Manager This module allows you to add
Categories, Subcategories and Products and to delete Categories.
New Category Button: Allows you to add a new Category
- When you click the button
the dialogue box shown below appears and you simply fill in the name of a new category
you wish to add and then click the “Add” button to create a new category or
you can cancel the process by clicking "Cancel".

New Subcategory Button: Allows you to add a new subcategory
- When you
click the button the dialogue box shown below appears and you simply fill in the name
of a new category you wish to add and select its parent category from a
pull-down menu box "Select Category", then click the “Add” button to create
a new subcategory or you can cancel the process by clicking "Cancel".

Delete Category Button: Allows you to delete a category
- When you click this button
the current displayed category will be deleted. You should be CAREFUL
using this button.

Other
Options On The Category Manager Screen
Link Code
- Use these link codes if you would like to link directly to the specified
category or subcategory from a text link or a button on your web site.
To update a category name:
- First select a “Category”
from the drop down menu at the top of the screen. In this example we clicked
on the drop down menu and selected “Administration” as a category.
- Then type a new name in and click "Update" button - a new name for this
category will be stored in the database.

To update/delete/move a subcategory:
- First select a “Category”
from the drop down menu at the top of the screen. In this example we clicked
on the drop down menu and selected “Administration” as a category.
- Then click on the subcategory
name itself to get the "Edit Subcategory" dialogue box

- You can update the name of the subcategory, delete a subcategory or move
it to a different category by simply selecting a different category from the
drop down menu and clicking the update button.
View or update product info (same
as in Product Manager):
- First select
“Category” and “Subcategory” from the drop down menus at the top of the
screen.
- Next click on the “Product
List” button to display a list of products for that category and subcategory.
- You can sort the list alphabetically or by price by clicking on "Product
Number", "Title" or "Price".

- Then click on the product
link to display the product update/delete/move dialogue.
3. Product
Manager

A) To use Search for Product:
- First select a “Category” and “Subcategory” from the drop down menus (or
use "Search" to find the product by "Product ID/Number", "Title" or by
keyword).
- Next click on the “Product
List” button to display a list of products for that category and subcategory.

- Then click on the product
link to display the product update/delete/move dialogue
B) Update, Delete, Or Move A Product
To Another Category

- From this dialogue you can update
product information, delete a product, move a product to a new category and subcategory
or check thumbnails and images via the “Current file" links.
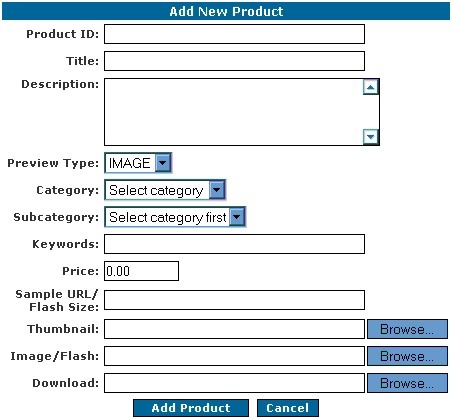
C) To use “Add New Product” form fill
out the fields for:
- Product
ID/Number: a unique alphanumeric identifier for
your product.
- Title: Product name.
- Description: Product description.
- Preview Type: Select type of preview you want to use for your product.
IMAGE - to display a bigger image with or without additional information that
you can specify in viewDetailsTemplate.htm file.
FLASH - to display a flash movie with or without additional information that
you can specify in viewDetailsTemplate.htm file.
URL - to redirect/show specified URL of your Demo Page or media file (PDF, MP3, WMV, ASF,
etc.)
- Category: Select from category drop down menu.
- Subcategory: Select from subcategory drop down menu.
- Keywords: Make your product searchable by specified keywords.
- Price: Product price.
- Sample URL/Flash Size: If you wish to show your visitors Demo Page of your product or
sample media file (PDF, MP3, WMV, ASF, etc.) you can put its URL here. This field
also can be used to specify the size of Flash movie (width,height separated by
coma. For example: 600,400).
- Thumbnail: Here you can upload a small graphic image from your computer to
be used in the product display. Click on “Browse” and then go to the image on
your hard drive and double click on it to upload it to your
website.
- Image/Flash: Here you can upload a bigger image or flash movie to use in detailed preview
of your product. If you upload a flash movie use "Sample URL/Flash Size" field
to specify its size (width,height separated by
coma. For example: 600,400).
- Please note: thumbnail and image file names should
be unique for each product.
- Download: Here you can upload your product file that your customers will be able to download after their payment is completed.
If you don't want to allow an instant download of your product just don't
upload anything (in this case use "Confirmation e-mail" text in General Settings to
explain to your customers how you are going to deliver purchased product).
- Once the form is filled
out click on “Add new product” to add the product to your catalog.
4. Order Manager

This module displays the list of orders and their status.
Order status:
"received" - order received but not paid yet (unpaid order will automatically deleted after period you set up in General Settings);
"paid" - payment complete, customer get download of purchased products and confirmation letter;
"error" - some error occured while processing this order (transaction field will contain error information);
Please note: Your customers will be able to download their purchased products
while you keep the corresponding record in order table.
If you wish to delete some
record, just put a corresponding checkmark and press Delete Selection button.
"#" - is the order number. If you click on the number
it will open a new window with details of this order:

Please note: If you do not allow instant download of some of your
products you will see
E-mail in Delivery column, it means that you should email this
product to your customer ASAP.
5. Payment Manager

This module allows you to set payment gateway settings to accept online payments.
When you click on the gateway name it will open edit page where you can edit your settings for this payment gateway.
If you do not want to use this gateway for your payment processing - just uncheck "use for payments"
field in gateway settings.
PayPal settings:

- "business" - you PayPal ID (e-mail address)
- "return" - URL of your PayPal download page. Default download page location is http://www.yourdomain.com/catalog/download/return-paypal.php
- "cancel_return" - URL where your customer will be sent if payment fails.
- "notify_url" - URL of your PayPal payment confirmation page. Default PayPal payment confirmation page location is http://www.yourdomain.com/catalog/download/confirm-paypal.php
- "currency_code" - currency you want to use for transactions (Visit PayPal for the most recent list of supported currencies)
- "submit button" - PayPal button code (you can use graphic image or standard button)
2CheckOut settings:

- "sid" - your 2CheckOut Store ID
- "password" - your 2CheckOut Secret Word.
- "submit button" - 2CheckOut button code (you can use graphic image or standard button)
- "test mode" - code to test your 2CheckOut account (clear this field to process real payments)
You need to make following account settings in your account control panel:
- Click on "Shopping Cart -> Cart Details" menu in your 2CheckOut account control panel.
- Enter your 2CheckOut payment confirmation and download page path in "Return URL" field.
Default payment confirmation and download page location is "/catalog/download/2checkout.php" - rename it for security reasons.
- Select "Yes" from "Return to a routine on your site after credit card processed?:" pull-down menu.
- Click "save changes" button to save your settings.
- Click on "Account details -> Return" menu in your 2CheckOut account control panel.
- Enter your Secret Word in "Secret Word:" field.
You should enter the same word as in your E-Store Kit-1 2CheckOut settings.
- Click on "Save Passback parameters" button to save your settings.
Internet Secure settings:

- "MerchantNumber" - you Internet Secure ID (merchant number)
- "ReturnCGI" - URL of your Internet Secure download page. Default Internet Secure download page location is http://www.yourdomain.com/catalog/download/return-isecure.php
- "language" - language to use for checkout page.
- "flags" - currency code etc. (Visit InternetSecure tech library for details)
- "submit button" - Internet Secure button code (you can use graphic image or standard button)
You need to make following account settings in your merchant control panel:
- Click on "Export scripts" menu in your Internet Secure merchant control panel.
- Click on "Export scripts Options" link.
- Enter your domain name in "Server Domain Name" field (without "http://" prefix).
- Enter your Internet Secure payment confirmation page path in "Web Page" field.
Default payment confirmation page location is "/catalog/download/confirm-isecure.php" - rename it for security reasons.
- Check "Send Approvals Only" checkbox.
- Click on "Update" button to save your settings.
VeriSign settings:

- "LOGIN" - you VeriSign login
- "PARTNER" - enter your partner name (it is in your VeriSign confirmation e-mail)
- "return" - URL of your VeriSign download page. Default VeriSign download page URL is http://www.yourdomain.com/catalog/download/return-verisign.php
- "submit button" - VeriSign button code (you can use graphic image or standard button)
You need to make following account settings in your merchant control panel:
- Click on "Account info" menu in your VeriSign control panel.
- Click on "PayFlow Link Info" link.
- Select "POST" from "Return URL Method" pulldown menu
- Enter URL of your VeriSign download page in "Return URL" field. Default VeriSign download page URL is http://www.yourdomain.com/catalog/download/return-verisign.php
- Enter URL of your VeriSign payment confirmation page in "Silent POST URL" field.
Default VeriSign payment confirmation page URL is "http://www.yourdomain.com/catalog/download/confirm-verisign.php" - rename it for security reasons.
- Check "Silent POST URL" checkbox.
- Check "Name" and "Email" (both Required Fields and Editable Fields) checkboxes from "Shipping Information" section.
- Click "Save Changes" button to save your settings.
CentiPaid settings:
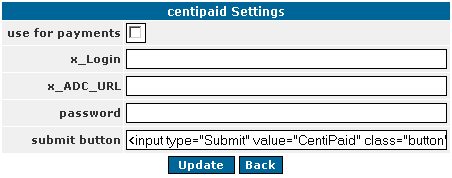
- "x_Login" - you CentiPaid account login
- "x_ADC_URL" - URL of your CentiPaid download page. Default CentiPaid download page URL is http://www.yourdomain.com/catalog/download/centipaid.php
- "password" - you CentiPaid password (for payment confirmation).
- "submit button" - CentiPaid button code (you can use graphic image or standard button)

|